Tuesday 20 January 2015

Wedding Overview, Sola Flower Crazy!

Ok its been far too long since I've posted on here, 8 months infact! So much happened in that time including me finally getting married.
As quite a lot of my wedding decor was handcrafted I thought I'd do a quick post to show everything! As I've previously posted, I fell in love with Sola flowers and chose to use them rather than real flowers for the entire wedding. Not only were they way cheaper than using fresh flowers, but I got to keep them! Infact I'm sitting looking at one of the smaller bridesmaids bouquets on the fireplace right now.

If anyone has found this post and is considering using Sola flowers GO FOR IT. I got so many compliments and when I went to gather them up the next day, alot of my flowers had somehow walked out of the door on their own so I'm assuming people really did like them and weren't just being polite lol.

First up is the buttonholes, pink for the Groom, father of the bride and best man, natural for the rest of the wedding party. I found the green burlap leaves on Ebay but they would be pretty easy to make yourself (by this point I was at the omg I'm never going to finish this in time stage so went for the easy option of buying them ready made)


Monday 12 May 2014

Free Crochet Patterns For Boys

Having a boy myself and being crafty, I know how hard it is to find items to crochet for them. With a new baby/toddler/little boy, of course you want to craft for them!

These are the top five free patterns I have found for little boys. I also have a few available on my blog

Crochet waistcoat/vest

Simple sandals

Crochet Tank Top

Crochet Dungarees


1. Crochet Wrap Around Baby Boots

http://www.imtopsyturvy.com/crochet-wrap-button-baby-boots-girls-boys/
I love this pattern from I'm Topsy Turvy and have made them several times for both my ds and dd.

2. Leaping Crochet Baby Hoody

http://www.mooglyblog.com/leaping-crochet-baby-hoodie/

Its so nice to find a sweater that is crochet rather than knit!

3. Breezyboy Newborn Newsboy

http://breezybot.blogspot.co.uk/2012/01/free-pattern-breezybot-newborn-newsboy.html


A great alternative to a regular newborn hat from Breezybot

4.
http://www.innerchildcrochet.com/patterns/david_peacoat.php
How adorable is this Peacoat from Inner child crochet

5.
http://www.crochettoday.com/crochet-patterns/boys-varsity-sweater-free-pattern
This Varsity Sweater from Crochet Today is ideal for slightly older boys.

Thursday 6 March 2014

Diy Kraft Pocketfold Wedding Invitations Tutorial

Wedding planning is plodding on, most important things are booked, just need to sort out little details now, 7 months to go!!

One of the first impressions of your wedding your guests will see is the wedding invitation landing on their doormat. If you are having a themed wedding, you should really give guests an idea of what to expect, however if like me you are not having a majorly themed wedding, a vague idea of colour scheme will do!

Our theme is (for the time being..) a bit rustic, but not overly so (ie no birdcages and definitely no mirrored plates!) On the seemingly never ending search for suitable invites I discovered the kraft paper style and fell in love! Then I saw the price and cried lol BUT with a bit of planning and hard work, we've diy'd our invites and hopefully this tutorial will help some of you.

pocketfold


Supplies needed (per invite)

1 x 130 X 130mm pocketfold - mine was the flat, not ribbed style
1 x A4 pattern background paper (you will use the whole sheet per invite for backing and belly band)
2 x 120 x 120 mm insert
1 x 120 x 105mm insert
1 x 120 x90mm insert
1 x 140 x 140mm kraft envelope (main envelope)
1 x 95mm x 122 mm kraft envelope (for rsvp)
Double sided tape
Rubber stamp and ink (mine is a Noolibird stamp)
Printer (or get them professionally printed if you prefer)


Firstly you need to make a template for your backing paper, it saves loads of time and will ensure all your invites look the same and are not wonky! Simply lay your pocket fold out flat and trace around it onto thick card. You may notice it doesn't reach the bottom of the pocket fold, but don't worry this is inside the flap and wont be seen!


Cut out and CHECK IT FITS.  I recommend testing your template using scrap paper/newspaper, whatever you have spare before cutting your precious patterned paper!
Once you have this then start cutting your backing paper. I found I could cut through three at a time but if you are unsure, just do them individually, better to be safe than sorry. I also cut and stuck as a went, mainly to stop boredom, but also just to double check they fit as I went. IMPORTANT! The strip left over at the side is the belly band, do not touch it with those scissors and keep it safe!!!


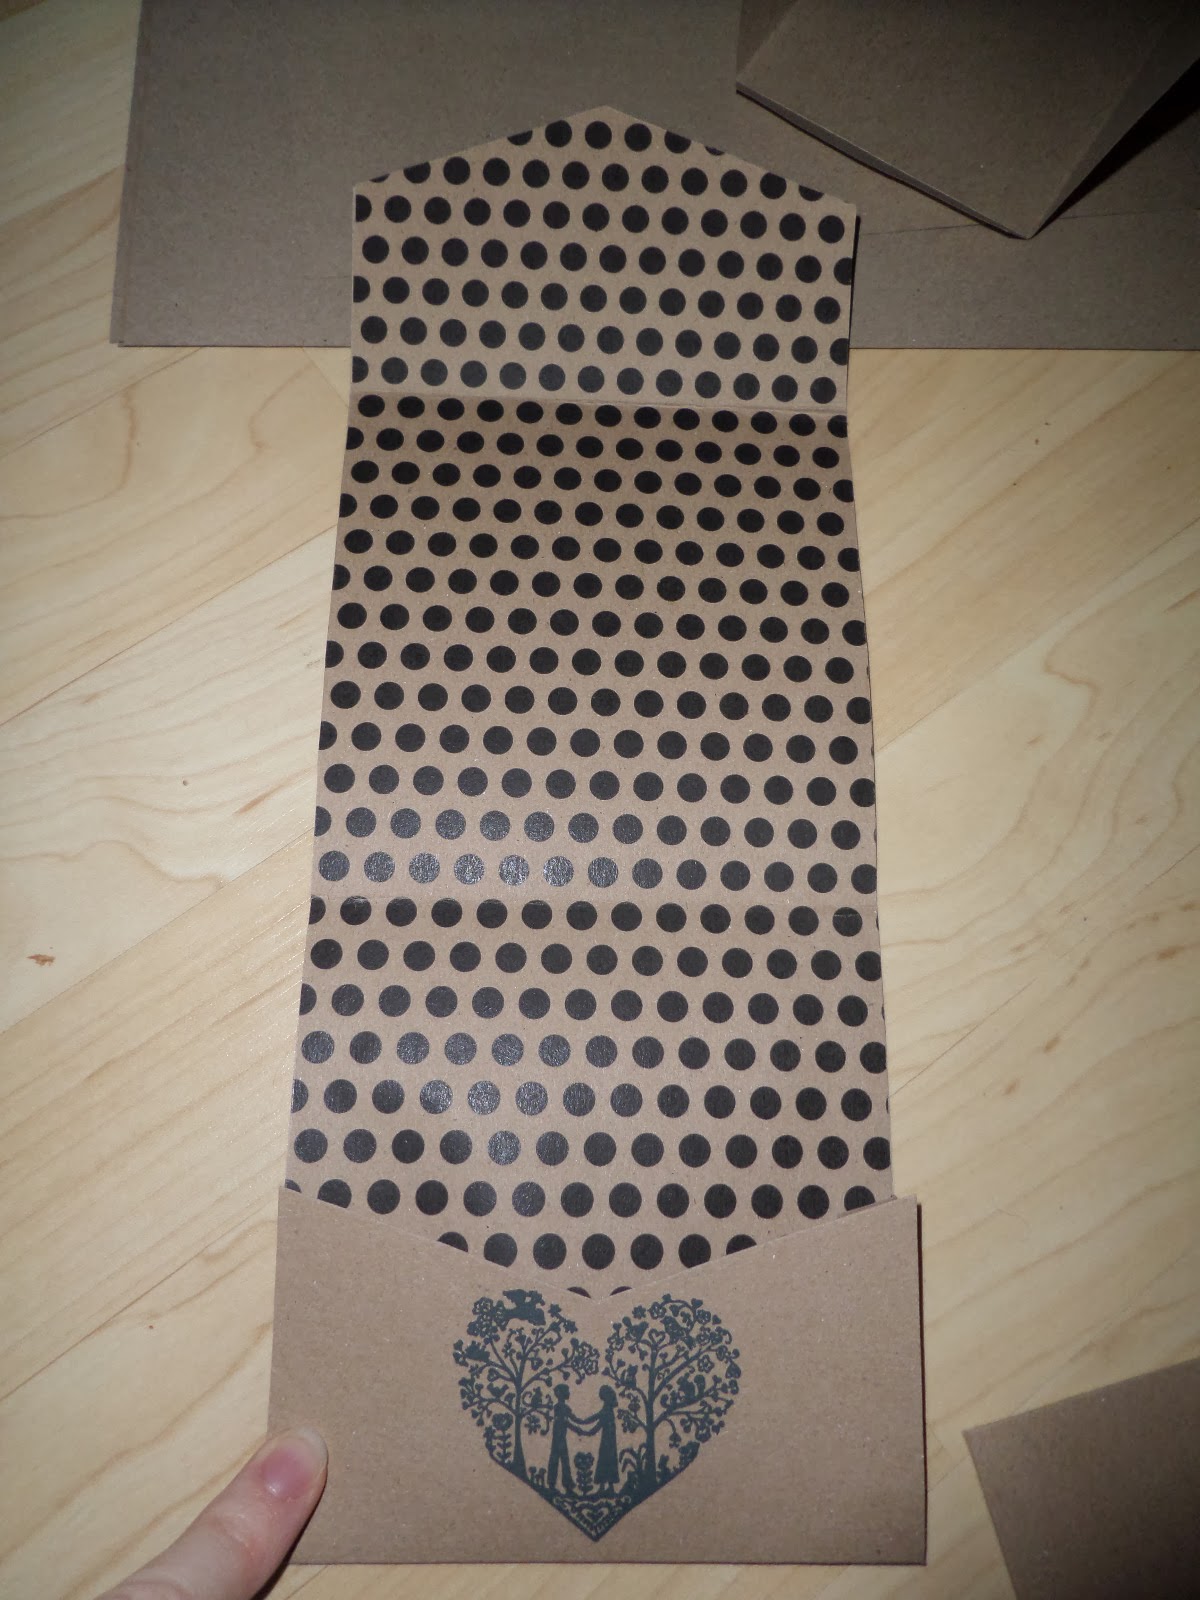
Now the tricky part, sticking it on smoothly! Attach tape to the pocket fold flap at the top, and very carefully line your backing paper up and smooth down. When the top is stuck, fold the pocket fold up, making the creases in the backing paper before you stick the rest down as I found this helped prevent creases. then simple attach tape to the edges  and just underneath the folds, and gently place the paper down, smoothing with the other hand as you go.


Next stage is stamping. Its pretty easy but if you've never stamped before do some practise stamps on scrap paper, simply line your stamp up with the v in the pocketfold and stamp away!

Attach tape to your pocketfolds and tape them up - pocketfold done!

(notice my classy information hiding of scraps of paper... they are not there on the real thing obviously!)

Printing - OK..if you are clever and creative you can make your own fabulour design and print it. However, if you are like me, sadly lacking in the creative department, either buy someone elses fabulous designs (Etsy have some gorgeous ones) or use a free one! I went for the free option of course and used a template from the amazing Weddingchicks website. Pick your colours( mine was all black text), add your details and download the pdf, easy.

Yes I know the bottom insert is a different colour, this was a practise one and is printed on the wrong side of the insert!
I know some people have trouble with getting their designs to fit on the inserts, especially the smaller ones but do what I did...cheat! If you search for pocket fold invites uk, you can download their templates for free! (ok maybe they want you to actually order from them but tough!) check you pick the right one *coughoriginalpocketfoldcough* download the invitation and insert templates and ta da, there you have templates the exact size you need! We kept our inserts really simple, just the details needed and downloaded a matching font for the headers.


We're nearly done I promise! So you've now got your pocket fold, and all the inserts ready, all that is left to do is the belly band which couldn't be easier! Hold the strip of background paper left from lining the pocket fold, check there's no scraggy edges and that the pattern looks ok. Some of mine ended with half a polka dot at the edge which really annoyed me so I trimmed them. Maybe that's a bit obsessive though. Line the middle of the band up with the centre of the pocket fold, and fold it around. It SHOULD be the perfect length as long as it was A4 to start with, and you used 130 x 130 mm pocket folds! Stick together with some double sided tape, making it tight enough to hold it but giving a teeny bit of give to allow people to slide it off if they don't want to rip it and you are done!


I hope this helps some of you or at least gives you an idea! Its cost me about a quarter of what it would have to buy them and I have the stamp left to continue the theme throughout the menu and table plan. If anyone would like to know where I bought from then let me know!


Thursday 20 February 2014

Sola Flowers

Well its been a while, life well and truly got in the way - 2 children under 3, increase in working hours, Christmas, birthdays and wedding planning have taken up all of my time. Its one of these things I am going to focus on today though, it is of course THE WEDDING! I'm sure most people who have planned a wedding will agree that it completely takes over your brain to the extent of when doing a nappy change you start wondering which cloth nappy to buy to match the flower girl dress you have for your daughter (is that crazy?)

Anyway, we are attempting to do this wedding on a budget (saving for a house deposit at the same time) and the cost of flowers was pretty shocking. I attempted coffee filter roses (look back on the blog, pretty hideous) then thought of getting silk until I stumbled upon Sola flowers! Made from balsa wood, they are handmade from soft wood and most importantly REALLY CHEAP! You can buy them ready made (look on Etsy, they are beautiful) but that is obviously more expensive than making them up yourself.

Sola flowers are pretty unheard of in the UK but I was lucky enough to find a bag of them leftover from someones wedding on Ebay which I bought just to check I did like them in person before I had them shipped over from America. The beauty of sola flowers is that you can easily dye them any colour you want. These were dyed (rather impatiently) with food colouring

Friday 4 October 2013

Knitted toddler hoody

 I haven't made anything for my son in quite a while now, and I really wanted this to turn out OK but..well you'll see. I picked this pattern, it has really good reviews on Ravelry and everyone else's seems to be brilliant...but for some reason I decided to do the 18 month size when my son is coming up to 24 months and is big! DOH


Way too small, the hood doesn't even go over his head lolol. Oh well I tried I'll add a bow on and save it for my daughter.
This is his camera face, whenever we take a photo of him now this is what we get!

Anyway, it really is a lovely and easy pattern I would recommend it, just pick the right size!

Thursday 3 October 2013

Stage one of wedding craft

Well I'm really not sure if I've mentioned it before but I am actually engaged, have been for 5 years now, we've done it a bit backwards and had the children first but we're now finally starting to plan our wedding..our extreme budget wedding I should probably add.
Like millions of other brides to be I've been scouring pinterest pinning endless ideas I'll never actually do but one I have attempted is the coffee filter roses that kept popping up.


I used this tutorial (which has the link to the free template) and well... to be honest mine have turned out a bit raggedy and ENORMOUS. The photo above is after one dip in red food colouring which has given the ends a nice pink tint but the rest of the petals have gone a dirty white...not exactly what I had in mind!
I'm persevering with it (well I have a packet of coffee filters, I may as well use them all! I think the main problem is the are so big, so next batch will have the last 2 layers of petals left off, we'll see how that looks..then of course theres the issues with the colouring. I might attempt a tea dip but I'm a bit worried that will just look like...well a used coffee filter lol

Heres some more pictures of my attempts anyway, the latest 3 havent been dyed yet.


And one final photo which is by far the best, I think I might end up just carrying my dd in front of me like a bouquet...

Wednesday 2 October 2013

Toddler messy play

So my son is getting bigger and bigger, hes now started going to football classes, more and more identifiable words are coming out and hes getting harder to entertain! Having decided himself to drop his nap during the day, by 3pm hes grumpy, tired and irritable so what am I to do...MESSY PLAY! I'm pretty sure every toddler loves creating mess so an out of date bag of flour, a plastic serving tray and a whisk later we had this


Then we added water (and a lot more mess)

 He loved mixing it, squishing it in his hand, pouring the water and of course tasting it but it passed an afternoon, it was free and he loves it, Unfortunately afterwards I went in the kitchen to make a cup of tea and came back to this
Fast asleep, this quick 5 minute power nap added an hour onto his bedtime! sigh